Friday, May 1, 2009

Live Partition of Drives

Do you know that Windows Vista supports what is known as Live Partition of your Hard Drives. Till now we had to use either some sort of softwares or we used to partition when we are installing a new Operating System. Now with Vista you can do it any time without any risk of losing your data. In order to do it follow the steps given:

Step 1: Right Click My Computer and select Manage

Step 2: Then click Continue on the User Account Control Window that follows

Step 3: After clicking on Ok a Computer Management Window will be opened.


Step 4: From the left pane, expand in turn Storage -> Disk Management and you'll see all your drives in the right pane.


Step 5: Right click on the drive from where you want to extract the memory i.e., the drive whose space you want to shrink and then click on Shrink Volume. Wait until the querying is over.


Step 6: Once it is over a Shrink Window will appear. Enter the amount of Space you want to shrink and click on Shrink button


Step 7: Once shrink is over, right click on the new Unallocated Space shown in Green Color and then select New Simple Volume and a New Simple Volume Wizard will open


Step 8: Click on Next

Step 9: Specify the Volume Size and Click on Next. (By default it'll take the complete unallocated space)


Step 10: Assign the Drive Letter you want the new drive to have and then click on Next


Step 11: Give a Volume Name and if you want to perform a Quick Format then Check the option, also you can Enable File and Folder Compression by Checking that option. After doing everything Click on Next


Step 12: Now click on finish and wait for sometime then your new partition is created.


Note: If some error is shown then just restart your system and try again. Nothing will go wrong


Thursday, April 30, 2009

Restore Task Manager Disabled by Virus

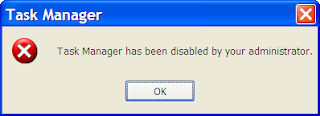
This problem is genearally faced by Windows XP Users. When you press Ctrl + Alt + Del, then instead of displaying the Task Manger something like this will be shown...                                                                                                                                                                                                                       


In order to restore taskmanager first make sure the system is free from anytype of viruses, trojans etc. Windows XP Proffessional users follow the steps as shown rest can see at the end for other Windows versions.

Step 1: Click Start -> Run and type gpedit.msc and click on Ok.


Step 2: After clickin on Ok, a Group Policy window will be opened.

Step 3: In the left pane, expand in turn 
       User Configuration -> Administrative Templates -> System -> Ctrl+Alt+Del Options
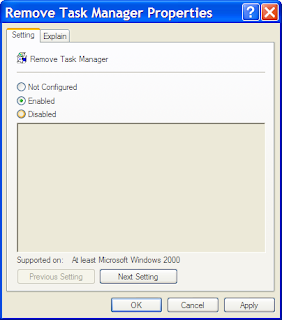
 then you'll see something like this on the right pane. 


Step 4Double click on Remove Task Manager to change its setting.


Step 5: Click on Not Configured and then click on Ok and restart your system.

"For users who don't have Windows XP, can follow the steps shown below"

Step 1: Click Start -> Run and type regedit and click on Ok.

Step 2: In the left pane, expand in turn, 
 My Computer -> HKEY_CURRENT_USER -> Microsoft -> Windows ->CurrentVersion -> Policies -> System and you'll see something like this


Step 3: In the right pane right click DisableTaskMgr and click on Delete and confirm that you want to delete as shown.


Step 4: Restart your computer.

Sunday, March 22, 2009

How to fix Show/Hide Files option in Folder Options

When you set the option to Show Hidden Files in Folder option, and after clicking apply or ok the the files are still not shown then your system is affected with virus.
Try first to remove virus from your system and then follow the steps below...

Step 1: Click on Start -> Run -> regedit (Note: You should have Administrator Privilege).

Step 2: In the left pane, expand My Computer -> HKEY_LOCAL_MACHINE -> Software -> Microsoft -> Windows -> CurrentVersion -> Explorer -> Advanced -> Folder -> Hidden -> NOHIDDEN

Step 3: Now in the right pane, Double Click "CheckedValue" in the name field, and enter the value in the Value Data as 2 and click on OK

Step 4: Now Double Click "DefaultValue" in the name field, and enter the value in the Value Data as 2 and click on Ok

Step 5: Nowfrom left pane select the next location i.e., SHOWALL
My Computer -> HKEY_LOCAL_MACHINE -> Software -> Microsoft -> Windows -> CurrentVersion -> Explorer -> Advanced -> Folder -> Hidden -> SHOWALL

Step 6: Now in the right pane, Double Click "CheckedValue" in the name field, and enter the value in the Value Data as 1 and click on OK

Step 7: Now Double Click "DefaultValue" in the name field, and enter the value in the Value Data as 2 and click on Ok

Step 8: Close the Registry Editor by clicking on the Close Button or File->Exit

Step 9: Restart Your Computer


Note: Do not change any other settings other than the mentioned above else you may not be able to switch on your system.