Wednesday, March 2, 2011

Automatically Restart and Logon to Your PC after Power Failure

Sometimes you might have wondered if your PC would have started automatically after a Power Loss. This happens to people who generally use their PC for downloading purposes like Torrents etc. In order to achieve this, you should make sure that your BIOS has this feature. My BIOS is Gigabyte GA-MA74GMT-S2. The setting takes place in two main steps: BIOS and Windows

For BIOS
Step 1: Restart your PC and Press Del at bootup.


Step 2: Select Power Management Setup and press Enter


Step 3: Select AC Back Function and Press Enter.


This function determines the state of the system after the return of power from an AC power loss.
  • Soft - Off The system stays off upon the return of the AC power. (Default)
  • Full - On The system is turned on upon the return of the AC power.
  • Memory - The system returns to its last known awake state upon the return of the AC power

Step 4: Select the Memory Option.


Step 5: Save and Exit from BIOS

For Windows

Step 1: Click on Start and Type regedit in the Search, after it is shown press Enter


or pressWindows logo key Picture of Windows logo key + R and then enter regedit and press Enter


Step 2: Goto HKEY_LOCAL_MACHINE -> SOFTWARE -> Microsoft -> Windows NT -> CurrentVersion -> Winlogon

Step 3: Choose Default Username.
In the right pane look for the key DefaultUserName and Double Click it. If not found create by right clicking on the empty spaces in the right pane -> New -> String Value

Enter your UserName in the Value Field.

Step 4: Choose Password for Default Account

In a similar way, create and edit DefaultPassword entry and enter the password for the Windows user account you chose in the previous step.

Step 5: Enable Auto Logon

Now that you have entered the username and password, activate the auto-logon. Find the keyAutoAdminLogon or create one if its not there. Double click the entry and enter the value 1.

Step 6: If you wish to have an option for logging in using another user account, create another key ForceAutoLogon. Edit its value to 1. To use this press and hold the left SHIFT key when Windows starts. This will allow you to use another user account.


Now close registry editor and your work is done.

Monday, January 24, 2011

Enable Task Manager

There might have been a time when you suddenly encountered that when you re-started your system your system has become unstable; you tried to stop some of the processes (running programs) by using the Task Manager. But this time when you tried to do so, either by pressing the Ctrl+Alt+Del keys together or by Right-Clicking the Taskbar and selecting Task Manager you encountered a message saying Task Manager has been disabled by your administrator as shown below.


In my previous post I've shown you a way to enable using gpedit.msc. This time i'll tell you how to enable by using a simple vbscript. But first you need to make sure that your system is free from viruses or trojans or other malwares. The best way to ensure this is to install an anti-virus in your system. According to me you can install Kaspersky Internet Security with all the latest updates if possible.

Step 1: Open Notepad

Step 2: Type the following into it

Dim WSHShell,val
Set WSHShell=CreateObject("WScript.Shell")
val=WSHShell.RegWrite("HKCU\Software\Microsoft\Windows\CurrentVersion\Policies\System\DisableTaskMgr","0","REG_DWORD")

Step 3: After typing you save the file eith any name but give the extension .vbs

Step 4: Now double click this file

Now check whether your taskbar is working or not. If still its not working try once more else your system is still having a virus active in memory. If the problem still persists contact me.

Tuesday, November 23, 2010

Enable Registry Editing

We use Registry Editor to perform some changes in the systems registry. But sometimes due to some viruses we face a problem and we are unable to open the registry editor and we get a message saying Registry Editing Has Been Disabled By Your Administrator when we type the regedit command in the run dialog box. In order to re-enable the registry editor we'll use the Group Policy Editor of Windows XP. Thus this procedure can only be implemented if your system is running Windows XP Proffessional. To enable the registry editor follow the steps given below:

Step 1: Open Notepad

Step 2: Type the following and save it with extension .vbs

Dim WSHShell,val
Set WSHShell=CreateObject("WScript.Shell")
val=WSHShell.RegWrite("HKCU\Software\Microsoft\Windows\CurrentVersion\Policies\System\DisableRegistryTools","0","REG_DWORD")

Step 3: Double click the file.

Step 4: Click on Start -> Run -> type regedit and press enter key and registry editor should be opened.

If it still displays a dialog box then it means there is some virus active in your memory. Try to first get them rid off using some anti-virus like Kaspersky Internet Security else contact me

Saturday, September 25, 2010

Disable Autorun of Pen Drives

Do you use your pen drive in Office Systems, College Systems or Cafe where there is no anti-virus??? If its yes then you have a very high chance of infecting your Computer with viruses. The viruses that spreads through pen drive are basically Trojans. When you insert your pen drive into the affected system the Trojan programs copies itself into your pen drive and creates a file with the name Autorun.inf. This is a file which makes the these viruses to spread into your system. Don't consider this file to be bad as the main work of this file is to load the contents or execute the program or any operation mentioned in it. Since viruses or Trojans are nothing but programs so they need to be executed once and to do this they make some changes in the Autorun.inf file if present or they simply add an Autorun.inf file to your drive. In order to protect your system if you don't have an Anti-virus then you should consider disabling the Autorun of drives. This can be done in following ways in Microsoft Windows Vista

Step 1: Click on Start and then click on Default Programs


Step 2: Then click on Change AutoPlay Settings


Step 3: In the AutoPlay Settings, uncheck the Use AutoPlay for all media and devices and click on Save.

Still the problem is not resolved. The second and most important thing is that you should not double click on the Pen Drive icon. To open the Pen Drive, just type in the drive i.e., F: or G: or H: in the address bar or in the Run Command.

XP users once you insert your pen-drive into your system, wait for a few seconds and then press and hold the shift key until the usb drive is detected completely by your system. Once it is done just open My Computer and type in the drive letter in the address bar i.e., f: or g: then press enter

Monday, May 3, 2010

Enable Folder Options

We might have noticed when our system was new we're able to see Folder Options under the Tools in any folder and even in Control Panel. But sometimes the viruses and some malwares makes them disable. The steps given below will work only with Windows XP Professional Edition. Before doing this make sure to scan your system and remove any viruses if any using a good anti virus.

Step 1: Click on Start -> Run and type gpedit.msc then click on Ok


Step 2: Then from the left pane expand in turn to,
User Configuration -> Administrative Templates -> Windows Components -> Windows Explorer


Step 3: Double click Remove the Folder Options menu item from the Tools menu in the right pane

Step 4: Select Not Configured and click on Ok


Now you can see Folder Options in Tools Menu

Tuesday, March 2, 2010

Enable Registry Editing

We use Registry Editor to perform some changes in the systems registry. But sometimes due to some viruses we face a problem and we are unable to open the registry editor and we get a message saying Registry Editing Has Been Disabled By Your Administrator when we type the regedit command in the run dialog box. In order to re-enable the registry editor we'll use the Group Policy Editor of Windows XP. Thus this procedure can only be implemented if your system is running Windows XP Proffessional. To enable the registry editor follow the steps given below:

Step 1: Click on Start -> Run and type gpedit.msc, click on Ok


Step 2: In the Group Policy window that is opened, from the left pane expand in turn,
User Configuration -> Administrative Templates -> System


Step 3: In the right pane, double click Prevent access to registry editing tools

Step 4: In the property window, select on Not Configured and click on Ok


Now your registry editor is enabled. Before doing this make sure to disinfect your system with a good anti virus.

Friday, May 1, 2009

Live Partition of Drives

Do you know that Windows Vista supports what is known as Live Partition of your Hard Drives. Till now we had to use either some sort of softwares or we used to partition when we are installing a new Operating System. Now with Vista you can do it any time without any risk of losing your data. In order to do it follow the steps given:

Step 1: Right Click My Computer and select Manage

Step 2: Then click Continue on the User Account Control Window that follows

Step 3: After clicking on Ok a Computer Management Window will be opened.


Step 4: From the left pane, expand in turn Storage -> Disk Management and you'll see all your drives in the right pane.


Step 5: Right click on the drive from where you want to extract the memory i.e., the drive whose space you want to shrink and then click on Shrink Volume. Wait until the querying is over.


Step 6: Once it is over a Shrink Window will appear. Enter the amount of Space you want to shrink and click on Shrink button


Step 7: Once shrink is over, right click on the new Unallocated Space shown in Green Color and then select New Simple Volume and a New Simple Volume Wizard will open


Step 8: Click on Next

Step 9: Specify the Volume Size and Click on Next. (By default it'll take the complete unallocated space)


Step 10: Assign the Drive Letter you want the new drive to have and then click on Next


Step 11: Give a Volume Name and if you want to perform a Quick Format then Check the option, also you can Enable File and Folder Compression by Checking that option. After doing everything Click on Next


Step 12: Now click on finish and wait for sometime then your new partition is created.


Note: If some error is shown then just restart your system and try again. Nothing will go wrong


Thursday, April 30, 2009

Restore Task Manager Disabled by Virus

This problem is genearally faced by Windows XP Users. When you press Ctrl + Alt + Del, then instead of displaying the Task Manger something like this will be shown...                                                                                                                                                                                                                       


In order to restore taskmanager first make sure the system is free from anytype of viruses, trojans etc. Windows XP Proffessional users follow the steps as shown rest can see at the end for other Windows versions.

Step 1: Click Start -> Run and type gpedit.msc and click on Ok.


Step 2: After clickin on Ok, a Group Policy window will be opened.

Step 3: In the left pane, expand in turn 
       User Configuration -> Administrative Templates -> System -> Ctrl+Alt+Del Options
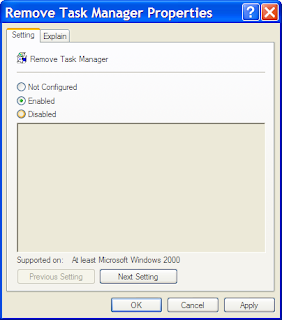
 then you'll see something like this on the right pane. 


Step 4: Double click on Remove Task Manager to change its setting.


Step 5: Click on Not Configured and then click on Ok and restart your system.

"For users who don't have Windows XP, can follow the steps shown below"

Step 1: Click Start -> Run and type regedit and click on Ok.

Step 2: In the left pane, expand in turn, 
 My Computer -> HKEY_CURRENT_USER -> Microsoft -> Windows ->CurrentVersion -> Policies -> System and you'll see something like this


Step 3: In the right pane right click DisableTaskMgr and click on Delete and confirm that you want to delete as shown.


Step 4: Restart your computer.

Sunday, March 22, 2009

How to fix Show/Hide Files option in Folder Options

When you set the option to Show Hidden Files in Folder option, and after clicking apply or ok the the files are still not shown then your system is affected with virus.
Try first to remove virus from your system and then follow the steps below...

Step 1: Click on Start -> Run -> regedit (Note: You should have Administrator Privilege).

Step 2: In the left pane, expand My Computer -> HKEY_LOCAL_MACHINE -> Software -> Microsoft -> Windows -> CurrentVersion -> Explorer -> Advanced -> Folder -> Hidden -> NOHIDDEN

Step 3: Now in the right pane, Double Click "CheckedValue" in the name field, and enter the value in the Value Data as 2 and click on OK

Step 4: Now Double Click "DefaultValue" in the name field, and enter the value in the Value Data as 2 and click on Ok

Step 5: Nowfrom left pane select the next location i.e., SHOWALL
My Computer -> HKEY_LOCAL_MACHINE -> Software -> Microsoft -> Windows -> CurrentVersion -> Explorer -> Advanced -> Folder -> Hidden -> SHOWALL

Step 6: Now in the right pane, Double Click "CheckedValue" in the name field, and enter the value in the Value Data as 1 and click on OK

Step 7: Now Double Click "DefaultValue" in the name field, and enter the value in the Value Data as 2 and click on Ok

Step 8: Close the Registry Editor by clicking on the Close Button or File->Exit

Step 9: Restart Your Computer


Note: Do not change any other settings other than the mentioned above else you may not be able to switch on your system.